Some time ago, I worked on a company project that utilized the Raspberry Pi / Raspbian running Google Chromium for a solar power project for Malaysian schools (Green School Campaign Phase 3, 2014).
The PenjanaBebas-KeTTHA Green Schools Campaign (GSC) is a public-private partnership CSR (Corporate Social Responsibility) programme that brings renewable energy into Malaysian schools, supported by Kementrian Pendidikan, JKR, TNB, SEDA, Suruhanjaya Tenaga, etc. You may also view PenjanaBebas-KeTTHA Green Schools Campaign portal for live information.
Green School Campaign Phase 3, 2014 replaced PC / Windows running Google Chrome with Raspberry Pi / Raspbian running Google Chromium. Whether PC / Windows running Google Chrome (Phase 2, 2012 to 2014) or Raspberry Pi / Raspbian running Google Chromium it was a Kiosk application (non-interactive).
The Hardware and Software choices was by others and free issued for my work.
Hereby I am listing the configuration and setup of Raspberry Pi / Raspbian used in this project:
The hardware utilized was the Raspberry Pi Model B+ V1.2.
Here is a description lifted from
Raspberry Pi.org.
The Model B+ is the final revision of the original Raspberry Pi. It replaced the Model B in July 2014 and was superseded by the Raspberry Pi 2 Model B in February 2015. Compared to the Model B it has:
- More GPIO. The GPIO header has grown to 40 pins, while retaining the same pinout for the first 26 pins as the Model A and B.
- More USB. We now have 4 USB 2.0 ports, compared to 2 on the Model B, and better hotplug and overcurrent behaviour.
- Micro SD. The old friction-fit SD card socket has been replaced with a much nicer push-push micro SD version.
- Lower power consumption. By replacing linear regulators with switching ones we’ve reduced power consumption by between 0.5W and 1W.
- Better audio. The audio circuit incorporates a dedicated low-noise power supply.
- Neater form factor. We’ve aligned the USB connectors with the board edge, moved composite video onto the 3.5mm jack, and added four squarely-placed mounting holes.
The Model B+ is perfectly suitable for use in schools: it offers more flexibility for learners than the leaner Model A or A+, which are more useful for embedded projects and projects which require very low power, and has more USB ports than the Model B.
The software (Operating System) utilized was Raspbian.
Raspbian - is the Raspberry Pi Foundation’s official supported operating system.
One may install Raspbian directly or using NOOBS (New Out Of Box Software).
Here is a description lifted from
Raspberry Pi.org.
NOOBS is an easy operating system installer which contains Raspbian. It also provides a selection of alternative operating systems which are then downloaded from the internet and installed.
I chose NOOBS. At the time of the project, it was NOOBS V1.4.1.
Additional software and / or tools were needed for this project:
- 7-Zip (V9.20)
- SD Card Formatter (V4.0)
- Win32 Disk Imager (V0.9.5)
- PuTTY: A Free Telnet/SSH Client (V0.65)
My work computer is an Asus A53S series running Windows 7 Professional 64-bit. In this case, the software tools utilized for this work were all Windows based software (blush). Of course, you can complete this project with Linux based tools as well.
Normally, I use 7-Zip for zip-file extraction. 7-zip is very efficient, fast and multi-function. 7-Zip is a utility program to help you extract compressed files and create your own compressed files in several different formats. 7-Zip can handle multiple compression formats. It can package files into 7z, ZIP, GZIP, BZIP2, and TAR formats, and it can unpack all those, in addition to ARJ, CAB, CHM, CPIO, DEB, DMG, and more.
However, in this instance I used the "Extract All..." function built-into File Explorer...
Let's begin...
Downloaded
NOOBS_v1_4_1.zip (750MB) to my default Download location (Downloads folder).
The files were extracted to it's own directory.
Copy the entire directory and it's contents to the micro-SD card. I used a Kingston 16GB Class 4, micro-SD card. I also tried with a Kingston 16GB Class 10, micro-SD card and it worked fine.
The Raspberry Pi should be prepared for OS installation i.e. connected to keyboard (USB), mouse (USB) and monitor (HDMI) and connected to Internet (Ethernet / RJ45) interface).
DO NOT POWER-UP YET!
Eject the micro-SD card (with NOOBS) and insert into the Raspberry Pi.
NOW POWER-UP!
NOTE: I tried to connect Microsoft Wireless Desktop 3000 (keyboard and mouse combo) - NOT SUCCESSFUL! This happens because only standard drivers are packaged or rather hardware specific drivers not NOT packaged with Raspbian. Use only HID Keyboard Device and / or HID-compliant mouse - Microsoft-speak for "Generic Keyboard and Mouse" or hardware specific drivers NOT required. The Logitech Wireless Combo MK220 & Logitech Wireless Combo MK240 models are "No software installation" type. When I connected the MK220 - SUCCESSFUL, MK240 - SUCCESSFUL!
I chose Raspbian [RECOMMENDED]. Click Install.
If you see the following screen, Raspbian was installed SUCCESSFULLY.
After successful installation, the Raspberry Pi booted into the CLI (Command Line Interface) or bash. bash is a Unix shell written for the GNU Project used by most Linux distributions and Debian in particular. Login using the default Username and Password.
You are immediately taken to raspi-config. If you want to do this later, you can comeback to this anytime by typing "sudo raspi-config" at the command line or in Terminal.
If you need to change your language and keyboard settings in the configuration program (raspi-config), you will find them under Internationalization Options.
Change your language under Internationalization Options → Change Locale
Change your Timezone under Internationalization Options → Change Timezone
Change your keyboard settings under Internationalization Options → Change Keyboard Layout
As with any Linux installation, it is ALWAYS a good idea to run the OS update.
It's a good idea to install any anti-virus software now. I did NOT install any, though I normally install RKHunter and ClamAV in all my Linux installations.
This tool (
ARP-TOOLS) may come-in handy for maintenance and troubleshooting later on.
This tool (
xrdp) may come-in handy for maintenance and troubleshooting later on.
This tool (
avahi) may come-in handy for maintenance and troubleshooting later on.
A Javascript browser was the project requirement. We chose Google Chrome / Chromium as it's full screen feature was useful for our project. You may install any other browser according to your requirements.
To give a more elegant look, we installed additional fonts.
We didn't make any changes here.
Please note that "nano" is a built-in editor for the Raspbian. Nano is archaic and cryptic but efficient and useful. Another built-in editor is "leafpad". Leafpad is the default text editor for the LXDE Desktop environment. We shall be using Leafpad soon.
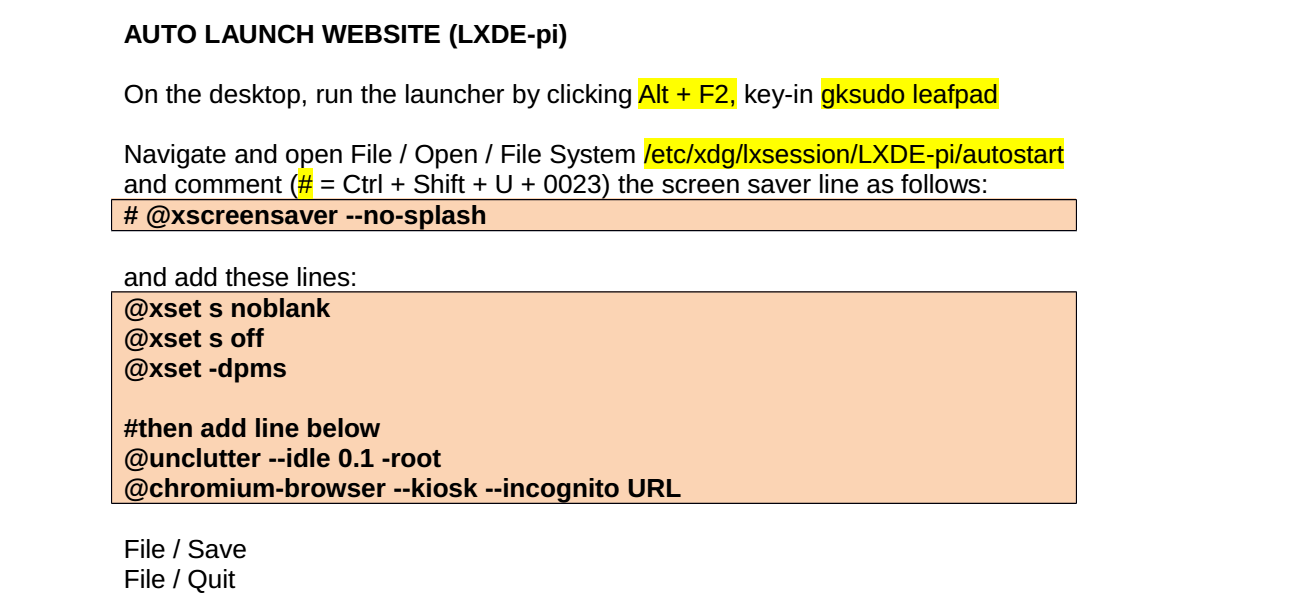
We set-up Raspbian to run the Desktop automatically / by default every time it boots.
As we are running a Kiosk application (non-interactive), we DISABLE the screensaver.
We also HIDE the cursor as our Kiosk application is display only, we do NOT require user input. Unclutter hides your X mouse cursor when you do NOT need it, to prevent it from getting in the way. You have only to move the mouse to restore the mouse cursor.
We set-up Raspbian to auto-login automatically / by default every time it boots.
We used 42" LCD TVs as our monitor. These were either Haier or Sharp and came with 2 x HDMI inputs. The above settings allowed us to align the display and fine-tune the borders. It was different for each brand and it was also different when the lengths of the HDMI cable changed.
There was some changes between NOOBS_v1_4 and NOOBS_v1_4_1 resulting in dual configuration as above. The above works for our project.
In the school environment, we wanted to switch OFF the LCD TVs during the night - this shall save energy consumption and also the LCD lifespan. Another fact of life outside of Kuala Lumpur is the erratic utility / TNB supply. The schools face power cuts once or twice every week. During the installation phase, we were trying out many different software, configuration and setup to find the best one and the Raspberry Pi did crash or hang. We realized that most times a reboot would set right the Raspberry Pi. In this case, I used cron set-up the LCD TV to switch OFF at 2000h at night and REBOOT every morning at 0700h.

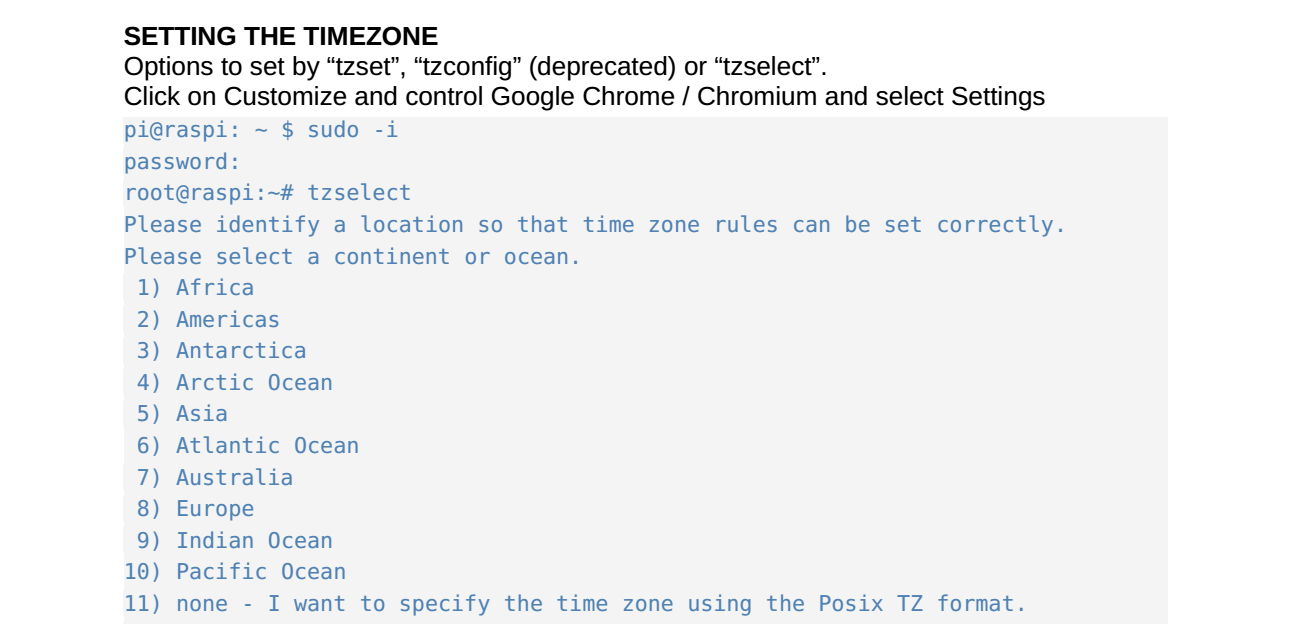
The Raspberry Pi does NOT have a hardware / real-time clock. Therefore, we have to utilize software for accurate date and time. NTP (Network Time Protocol) is packaged with every Linux distribution including Debian. However, it has to be manually set-up. Obviously, with cron running schedules, it is critical to set the accurate time and date. I ran tzselect - the tzselect program asks the user for information about the current location and outputs the resulting timezone description to standard output. The output is suitable as a value for the TZ environment variable.
After the installation at the 1st school was finalized, we were satisfied with the software, configuration and setup, we were ready to roll-out to other schools / sites. We used the Win32 Disk Imager utility to make an image of the Raspberry Pi's micro-SD card ONTO my HDD.
From then on, we just reversed the process and used Win32 Disk Imager utility to make an image of the Raspberry Pi's micro-SD card FROM my HDD. Minimal changes were required for LCD TV settings and URL reference.
We rarely used the SD Card Formatter utility. Since the micro-SD cards were pre-formatted.
However, it was useful during the 1st installation as were trying out many different software, configuration and setup to find the best one, we more than once had to re-format the micro-SD card and begin from scratch.
I have a separate article to
compare the Raspberry Pi and PC / Windows.
The above setup is working seamlessly and without trouble at our sites.
Happy try-out! Hope you enjoy your Raspberry Pi experience!
CAUTION: Your circumstances, connections, interfaces, options and versions may differ and needs to be re-evaluated for your specific application.